
I love my art journal and would LOVE to someday go on an art-journaling retreat. In the meantime, today I’m going to share with you how you can DIY your own art-journaling retreat from the comfort of your own home. All you need are some supplies and creativity!
I’ve mentioned before that I love to journal but when I discovered art-journaling right after college, I fell in LOVE. My art journals were quickly filled with colorful creative expressions that had never made it into my regular journals. I love how you don’t have to be an “artist” to art journal. All you need is a desire to express yourself creatively. I’m serious. This isn’t a contest. The point is to express yourself and to create a pictorial document of your creative journey. Some pages will be lush and gorgeous. Some, not so much. If you feel like you’ve made a mistake, turn the page. There’s always a clean slate just around the corner.
I’ve clicked through many an art-journaling retreat website in my day and have always thought it would be so much fun to go to one. I mean, seriously, you know it would be creative supplies heaven and everyone would be chatting and creating together . . . how awesome would that be?
But here’s the secret. You don’t have to pay money to go to an art-journaling retreat. I mean, you can, and I’m sure you’d have an amazing time, but if you’re dying to try one, why don’t you just DIY one at home?
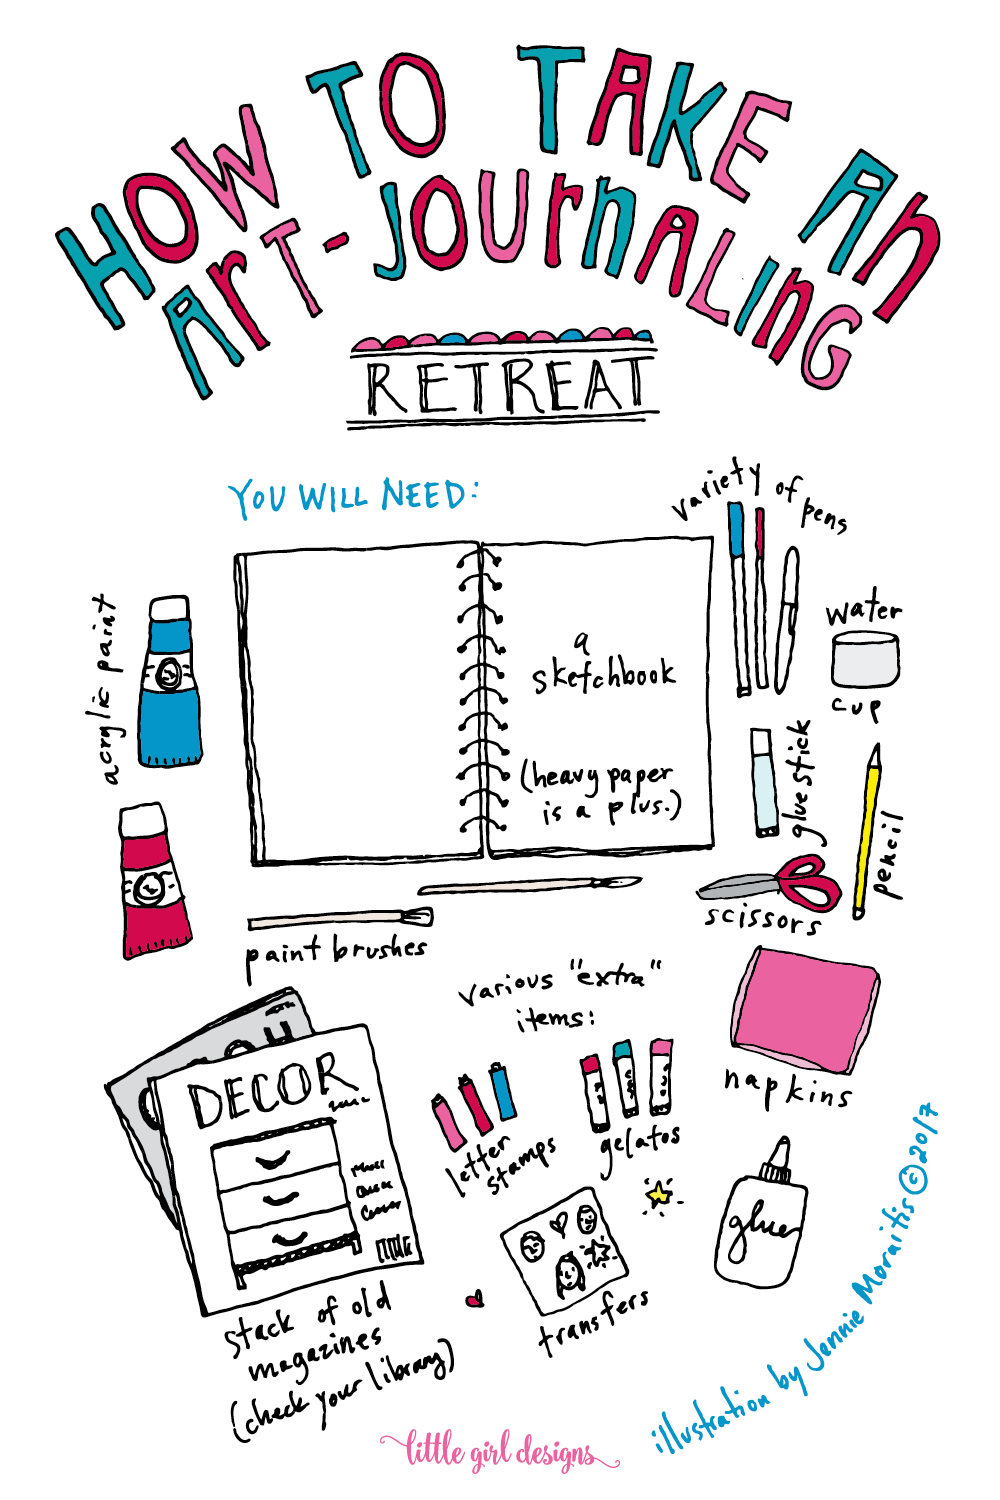
You don’t need fancy supplies to get started, but for the sake of this tutorial, I’m going to share some of the supplies I used in creating this art journal spread.
Prepping for your Art-Journaling Retreat
To start, you will need to schedule some time and space for your retreat. Set aside an hour in the morning and maybe an hour later on in the evening to finish the process. These two separate times will allow any wet paint to dry.
Gather your supplies into one place. You don’t have to have every single art supply on hand, but grab a few favorite pens and markers, a glue stick, regular white glue, some old magazines, scissors, gelatos (if you have them), paint, and a couple of paint brushes. You’ll also need a sketchbook. I recommend using one that has thicker paper since you will be layering paint and mixed media on it. Put your supplies in a box or bag and in the area where you will be retreating. Otherwise you’re going to spend most of the hour of your retreat digging around in craft drawers trying to find your favorite washi tape.
Right before it’s time for your art-journaling retreat to start, fill up your water bottle, put on some nice music, and prepare a light snack. (This will allow you to keep creating rather than stopping every five minutes to get a drink of water or something to eat.)
If you can, put your phone on mute and let your people know that you’re going to have some creative time. (I recommend letting everyone know about your retreat well before you begin so you can dive right in.)
Okay, you’ve got your music, your supplies, and maybe even a cup of hot tea. Take a deep breath and welcome to your art-journaling retreat!
What to Do During Your Art-Journaling Retreat
If you’ve been art-journaling for a while, I hardly need to tell you what to do. Given the opportunity, you’ll probably be painting pages and adding texture within two minutes of sitting down.
But if you’re a beginner, that blank page might be intimidating.
The fastest way to solve that problem? Mark-making. Grab a pen or some paint and cover the page with marks. Swirls, dots, doodles, whatever you’d like. Load your paint brush with water and paint and swirl it onto the paper. Watch it ebb and flow around the page. Fill the whole page up. When painting, use only cool tones (blues, greens) OR warm tones (oranges, reds.) This will keep your palette from turning brown and will keep the colors bright.
In the image below, I pulled out my opaque watercolor set and began painting . . .

While your paint dries, you can pull out the magazines and find images that speak to you. Cut them out. Are there any words that stand out? Snip those out too. You can also write words or draw images onto another piece of paper and cut them out. That’s what I did.
I don’t usually paint images with watercolors but I decided to be brave and give it a try. The colors pooled into each other. Some of them blurred and looked “wrong.” I kept on going and figured it’s all part of the process. I always have to remind myself that art-making is playing and that I’m not under contract to make something perfect. 😉
I used watercolor paper to paint this girl, and then I cut it out. At this point, I saw the theme of a brave girl emerging and so I painted the phrase, “brave girl” on a corner of the watercolor paper.

When your paint is dry, you can begin assembling the images you cut out from the magazine onto the background. Use your glue stick to lightly affix them to the page. Use gel pens and fine point Sharpies to add detail to the images. You can cut out an image of a woman and then trace her into your sketchbook. Fill her up with words, poems, and thoughts. Make those images your own!
Once my painting was dry, I pulled out the gel pens and began adding details to her hair. I also wrote in phrases, “the courage to speak”, “courage to learn”, etc. throughout her hair. I love tucking quotes and phrases throughout my art-journaling pieces.

If you are using waterproof pens throughout the decoration phase as well as waterproof inks and paints (such as acrylics), once you’ve finished and the paint is completely dry, you can apply a thin layer of white glue to the entire surface. This will make the magazine pictures lie flat, and it will dry into a beautiful matte surface. (You can write more onto this surface when it’s dry.)
Do not do this step if you used watercolors or water soluble pens or markers because your work will be blurred and smeared. For this particular piece, I skipped that step but I mention it because I do it 90% of the time. 🙂

If you’re nervous about venturing into art-journaling retreat-land all by yourself and would really, really like a teacher, then get your supplies out and check out a Jane Davenport video on YouTube. She’ll walk you through quick techniques that you can experiment with in your art journal. I also like Carla Sonheim’s You Tube tutorials because they are very accessible for the beginning artist. Always remember you can experiment and try different paints and mediums if you don’t have the exact one recommended in a tutorial. I do this all the time, and it’s a lot of fun.
Well, that’s my tutorial for how to create your own art-journaling retreat. I hope you enjoyed it, but better yet, I hope you have a chance to actually go on your own art-journaling retreat sometime soon. I know you’ll have an awesome time!
Have an amazing {and creative} day, friends!
The Creative Retreat book is all about making your own personal retreats.
Click here for more info!

8 responses to “How To Create Your Own Art-journaling Retreat”
I LOVE what you did with that! I haven’t art journaled in too long, but this makes me want to! Oh and by the way, I have the same watercolor set you have! I tried to comment that on one of your posts right after you got that set, but that was back when I wasn’t able to comment. But yeah, I’ve had that set for a looong time, probably over ten years, since I started art class! It’s served me well through the years!
Isn’t that watercolor set the best? I love how rich and vibrant the colors are; it was definitely a good find. 🙂 Hope you have a great weekend, Maggie!
Hi Jennie,
I bought a blank art journal last year and was nervous about starting because I didn’t know what to do.
This is SO helpful. I’m also checking out your other posts about journaling.
Thanks,
Sue
Thanks so much, Sue! I’m so glad you bought an art journal—that’s awesome. If you’re feeling nervous about facing that first blank page, feel free to scribble a bunch on it, or do what my cousin does and skip it all together! I need to write a post on blank page syndrome because it’s real. I still struggle with new art journals because they’re so perfect, and I don’t want to “mess them up.”
Hope you have a wonderful time playing and creating!
Have a great day,
Jennie
Jennie this is such a great idea. All we need is a quiet corner and a bit of time. OI already checked out your links at the end and sent them to my daughter who is a budding artist. But I think I can also benefit from them. Thanks for the inspiration.
Thanks so much, Mary! I’m glad you found some inspiration (and thank you for passing it on, too!) 🙂 I hope you’re able to take an art-journaling retreat soon. They’re a lot of fun. 🙂
I love the idea of art journaling in general, but to make yourself your own little retreat at home would be great. Love it! Thanks for sharing.
-Lauren
It’s a lot of fun! Hope you can take a mini-retreat soon, Lauren. 🙂