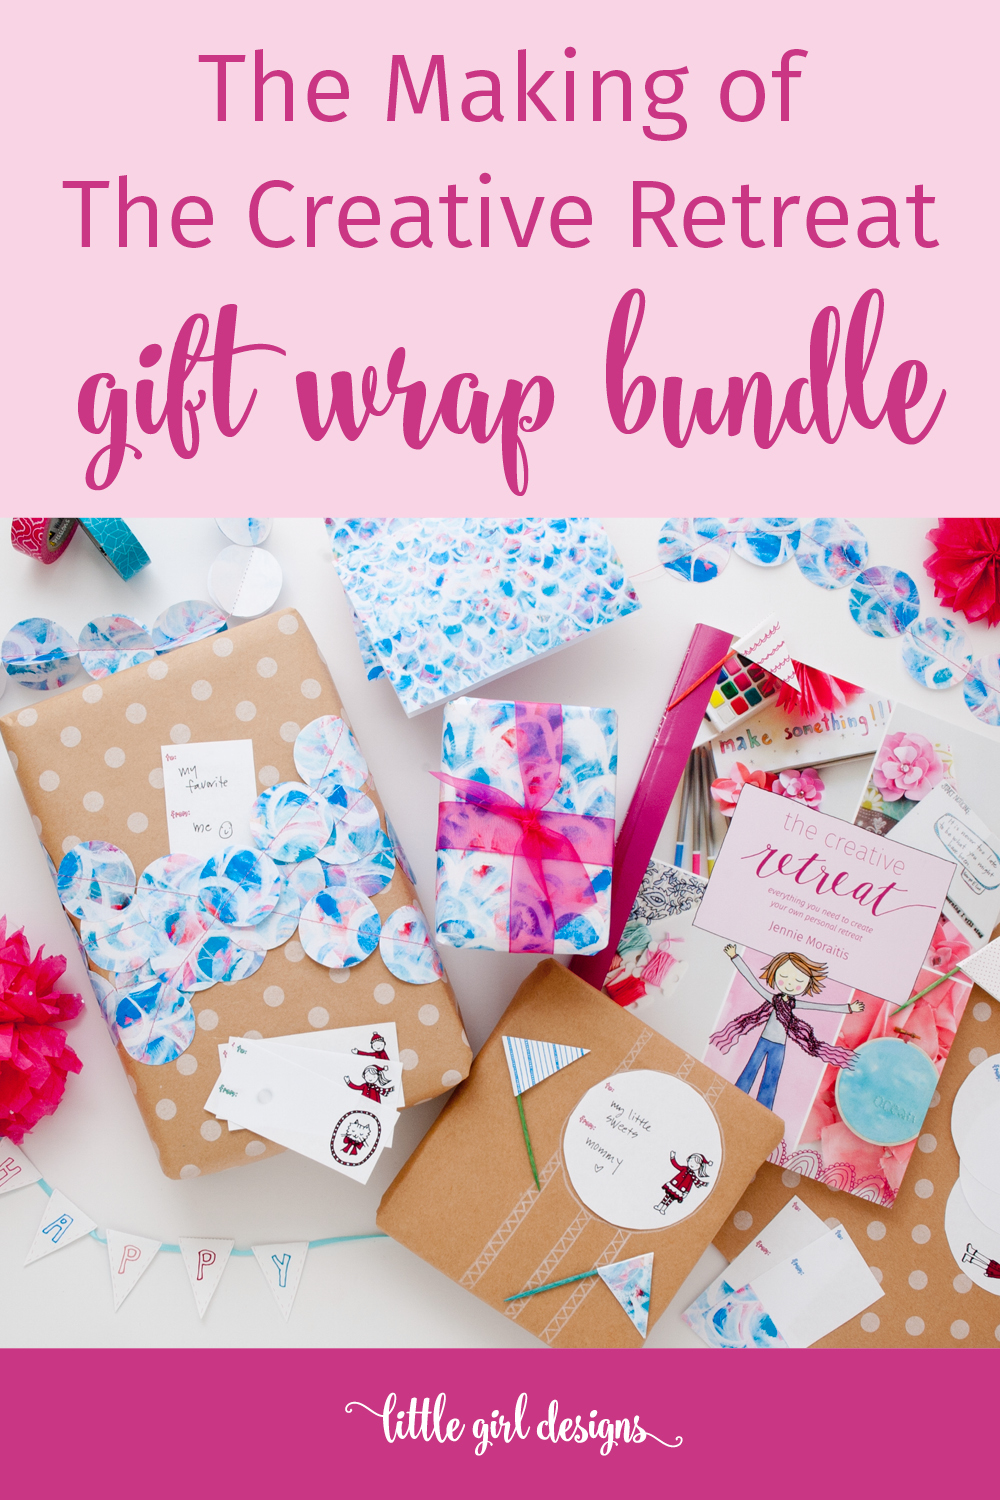
I don’t know about you but I love to learn about the behind-the-scenes workings of a business. So today, I’m going to take you on a tour of sorts so you can see the making of The Creative Retreat gift wrap bundle. (Click here to get it for 50% off!) I think you’ll really love it!
So often we only see the finished product and never know what really goes into making something you can easily print from your home computer. Go ahead and grab yourself a cup of coffee (or tea) and let’s go on a tour of how a project like this comes together.
The Making of The Creative Retreat Gift Wrap Bundle

Brainstorming
First and foremost, there’s the brainstorming phase. This is a fairly unstructured time as I tend to come up with new ideas while I’m doing dishes, on walks with my daughter, or out running errands. I jot down ideas onto paper even if I don’t think they will work.
At this point, everything goes. For this project, I wanted to do something special for the upcoming holiday season.
When we were printing proofs (sample sheets) of The Creative Retreat book, we ended up with several extra sheets of the end papers. I thought the design was really pretty so I kept the papers and started experimenting with them. One day, I wrapped a small gift in the paper, and ideas began flooding into my mind. Turns out that paper became the design basis for this entire project!

Illustrating
For me, the next step in the process is to illustrate my ideas. Because I was thinking about making a gift wrap bundle, I knew I’d need illustrations for tags. I also wanted to make several different sets of miniature bunting and small decorative cupcake flags, so those needed illustrations as well.
I sketch all of my illustrations on white mixed media or sketchbook paper and tend to use a black Sakura gelly-roll pen. At times, I also use micron pens if I want a really thin line and need to make sure the ink is waterproof. Because nothing is set in stone at this point, I try to just have fun and let my imagination go. I thought about children dressed up in their Christmas outfits and standing in the snow. And then I thought it’d be fun to have those children pointing towards the “to and from” parts of the gift tag.

Scanning
Once I have some illustrations to work with, I scan them into my computer. I scan them at 1,200 dpi (resolution) and black & white. I save them as png files. Doing so gives me the most versatility as I edit and color-correct the illustrations in the following steps. I also scan each image individually, so if there are several images on a page, I select one at a time and scan it. Because these images were fairly small, this step doesn’t take too long, but it needs to be done correctly as it is the foundation for what lies ahead.
We use an Epson Perfection 4180 Photo scanner that my husband has had for years for his work as a graphic designer. You don’t need a super fancy scanner to get the job done.

Color-Correcting
Once I’ve scanned the image, I open it up in Photoshop. I adjust the levels so image consists of only black and white with no grey. This virtually “erases” the look of sketchbook paper and focuses on the illustration only. (You can get a free trial of Adobe Photoshop here.)

My husband set up an action in Photoshop which does an entire series of actions with the click of a button. This saves so much time! At this point, I save each image and move on to Illustrator.

Vector Art Making
I could technically use the illustration at the end of color-correcting it in Photoshop, but I want to have more control and to be able to move around each element. This is where Illustrator comes in. Have I mentioned how much I love Illustrator? I used to be really intimidated by it, but now I use it every week for my projects. Anyway, back to the tour.
I open the illustrations in Illustrator and select Live Trace > Trace Scan. Then I press Expand and my image is officially vector art. Whoohoo! I can resize it at this point as well as clean up any scanning errors. Sometimes there are little bits of the art that I don’t want so I erase it at this point. I use the lasso tool to do this—just lasso it and hit delete. (My husband is probably cringing since I don’t think it’s called the “lasso tool.” Shh, don’t tell!)

Colorizing and Exporting
Now it’s time to digitally color in my art. In this case, I used the Live Paint Bucket. I magnify the art so it is easy to see each element, click on the image I’m editing to make it “live” and then proceed to fill each portion with the colors that I want. When we first started Little Girl Designs, we picked a color palette and have those colors loaded into Illustrator. This makes it easy for me to be consistent instead of guessing what colors I’m going to use each time.
After I’m finished with coloring the images, I save and export each one. Now it’s InDesign time!

Layout of the Files
InDesign is the program I use to layout ALL of my images, from Pinterest images to the images you see in this post, to my actual Creative Retreat book. It is a powerful tool. (You should get a free trial by clicking here. Who knows where your new graphic design skills will take you?)
For this project, my husband stepped in at this point to set up the main InDesign file. He can do it in a flash as I’m still a newbie with all of this fun stuff. Anyway, we knew at this point that this was going to be a book rather than just a couple of printables. So there needed to be a cover and back cover, pages that explained how to use each of the printables, and then the printable pages themselves. My husband made templates for these so we could quickly add and subtract how many pages we needed.

At this point, we also began bringing in the images that we had saved from Illustrator and making them into the actual tags that you get in the bundle. Up until this point, all I had were my stand along illustrations, but now we were making them into something. This is the super cool part. The book is starting to come together!
As you can probably see by now, by the time we get to this point, several weeks have gone by. Bigger projects like The Creative Retreat book took months. Still, I think its worth it! 🙂

Writing the Copy
I needed to write several pages of instructions so those who buy the bundle will easily be able to make the bunting, gift cards, cards, and wrapping paper on their own. These pages function as headers of sorts for each printable section. We knew we’d need pictures on these pages as well so you’d be able to see what these printables look like in action. At this point, we just made image boxes in InDesign as holding spots so we knew how much space we would need.

Making the Printables
Writing the copy and making the actual printables kind of overlapped with each other, but I’ll put them in this order for the sake of our tour. Once the printables were ready in InDesign, we exported them as a pdf and printed each page on our color printer. (For those who are curious, we have an HP Color Laser Jet Pro M252dw. In the past, we’ve used a more fancy-schmancy printer, but this one does an incredible and consistent job. I can’t even believe that laser jets printers are at a consumer price now. The prints are gorgeous.)
Anyway, once the prints were finished (aka, five seconds later), I pulled out the scissors and began cutting out each of the printables. Circle bunting, regular bunting, tags of all sorts, wrapping paper . . . it all needed to be cut out and assembled in order to be photographed. (And also to make sure we designed it correctly; it needs to work!)
I sewed the circle bunting on my sewing machine and made sure to make a sample representing each step. I cut lengths of ribbon and taped each little diamond of regular bunting onto the ribbon before folding them together. Small packages were wrapped, larger kraft paper packages were wrapped and decorated with circle bunting . . . this is the part where things start to look festive around here!
Once I had every single element cut out and assembled, it was time to photograph everything.

Photograph Time
It’s essential that products have great photography so we assembled our own homemade light box to insure we had the perfect lighting. We constructed a tent from a little indoor tent that is our daughter’s and draped a white sheet over it. The sheet was clamped in place so it wouldn’t shift and a white board was placed on the ground. Then we set up the camera and flash and hooked them to the computer.
My husband likes to take a picture, check it for focus on the computer, and then immediately color correct it in Photoshop. This actually allows us to see immediately if we’re meeting our intentions for the photography. There’s nothing worse than taking a million photos, uploading them to the computer, and then realizing they’re out of focus. It’s also difficult to see detail on the camera so seeing the photos large on the computer screen allows us to immediately see issues that need to be corrected.
I had several props as well as each of the elements to be photographed so while I set them up, my husband could color-correct or run off to read a story to our daughter really quick. This process takes a long time (or at least it feels like it to me.) You have to try different ideas in order to see what is resonating the most for you.
On a side note, before you set up an entire light box area, you can also use your phone or point and shoot camera and quickly stage the elements to see what look you’re going for. This definitely saves time.

Finishing Touches
After the photo session, the photos are added to the InDesign file. This allowed us to show the different steps in assembling the circle bunting as well as provide ideas on how to use all the different fun elements in this gift wrap bundle. I added the pictures to the cover and back covers and played around with a design concept that I thought would be nice. My husband polished that up a bit to make it really shine, and we were almost done!

Exporting the PDF
At this point, we export the PDF after making sure the setting are all correct. After all this work, if the PDF doesn’t open and print correctly, that would be really sad. The PDF is saved and ready to go now.
Sales Page
In order to share about this bundle, we needed to update our sales page with the new images and wording. This usually takes us a few days as we go back and forth with ideas on how we want to present everything.
This is what the final page looks like.

Time to Share!
This is when I start pinching myself. After all of this work—sometimes months of it!—we finally have a product to share. I’m really excited about this bundle because the printables inside can be used during the holiday season as well as throughout the year.
Yes! I want my gift wrap bundle!
Thanks so much for allowing me to be your guide on this tour behind the scenes. It was so much fun to share this process with you.
Have an amazing {and creative} day!